
-
Set Up Your Course’s Term
The first thing you will need to do is choose the correct term for your course.
-
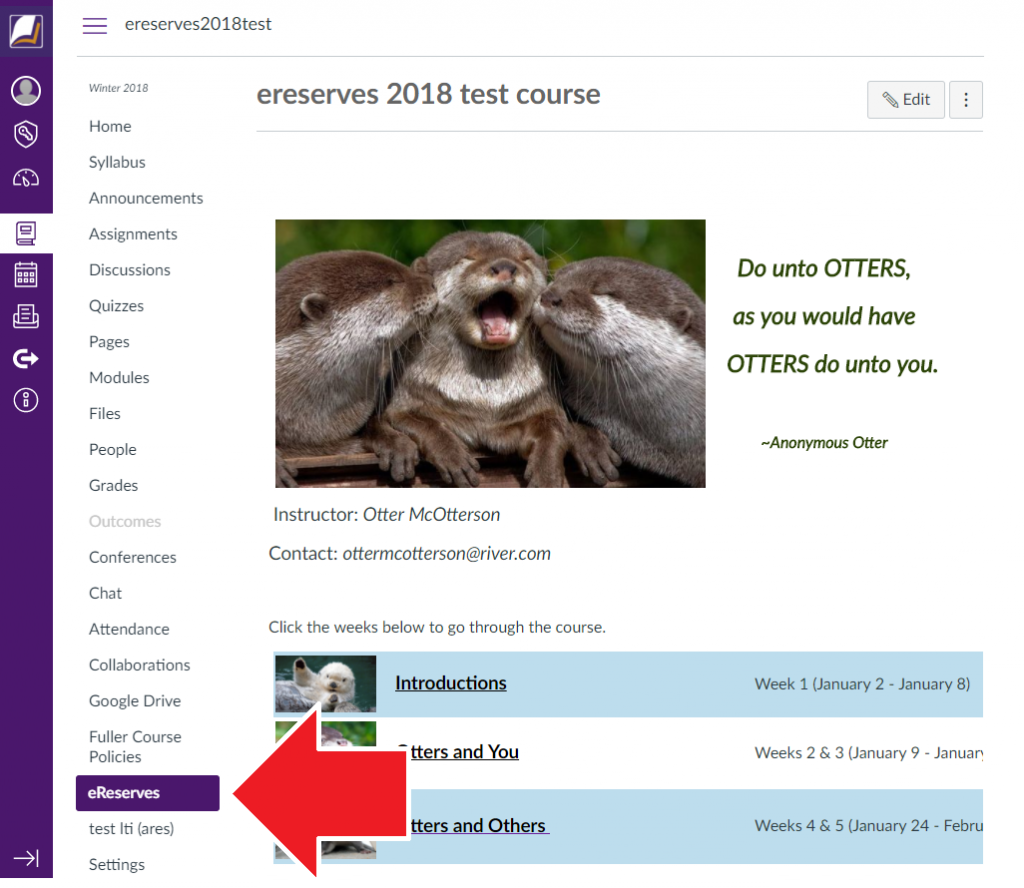
1.1 Find the eReserves Menu
Log in to the course Canvas page. Locate the eReserves menu on the left-side of the screen and click on it. This will take you to the course eReserves page and will get you started.
-
1.2 Selecting the Quarter
The first time you follow the link, you will be prompted to choose a term and create course. It is extremely important that you choose the correct term. If you start requesting items for the wrong term, it may impact whether or not they will be available to your students when you need them to be. When you highlight the drop-down menu, you will see three options for any given quarter:
Standard
Early Start
Year-LongNormally, you will want to pick the standard quarter that corresponds to the course you are teaching. This will grant students access to readings one week prior to the start of the term. However, if you are teaching a course that requires students to have access to material earlier than that, or if the course dates extend beyond a standard quarter, you will want to choose either the Early Start or the Year-long options. If you aren’t sure which quarter fits your course best, send us an email and we’ll be glad to help you make the decision.
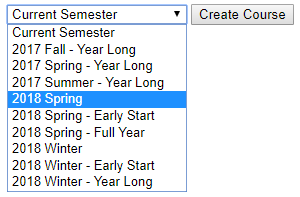
You will likely see other terms that have not ended appear in the drop-down menu before upcoming semester. For this reason, please do not use the “Current Semester” option as it will likely choose the wrong term for you. If you accidentally chose the wrong term, send us an email (ereserves@fuller.edu). You won’t be able to change it after the first time you configure the block but we can fix it on our end.
Now you can start adding eReserves items to your course.

-
Make a Request
When you are ready to request materials to be added to your course, follow these instructions.
-
2.1 Find the eReserves Menu
Log in to the course Canvas page. Locate the eReserves menu on the left-side of the screen and click on it. This time, you’ll be taken straight to the eReserves interface.
-
2.2 Go to the Form Submission Page
Look in the left-hand sidebar for a link that says “Add Reserve Items.” Click on that link and then choose what type of material you are requesting (article, book chapter, video link, your own unpublished work).
If you have previously taught a course, there is a method to copy your items from that course; however, we will walk through that in the importing portion of this tutorial.
-
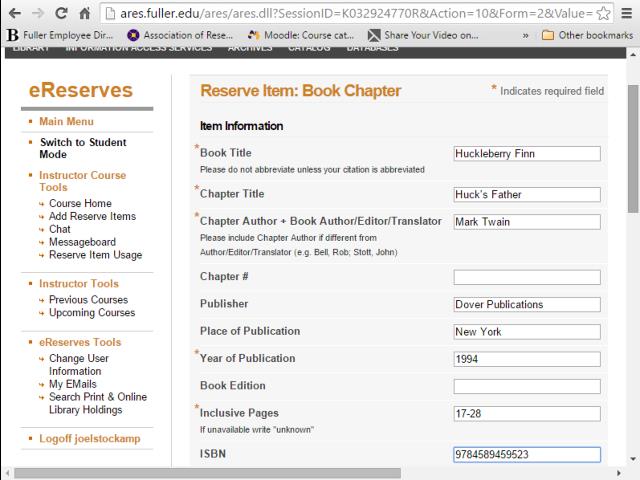
2.3 Fill Out the Form
Enter the information you would find in a standard bibliographic citation: title, author, publisher, publication date, and page numbers. If you know the ISBN or ISSN, enter that too, as it helps to expedite our search for the material.
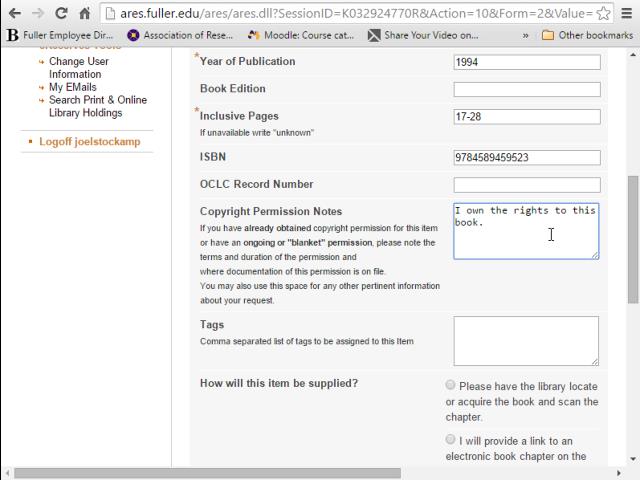
If you have any special information about the copyright of this work–for example, if you are the rightsholder, or if you have negotiated ongoing permission to use this material–please enter this in the field marked “Copyright permission notes.”
-
2.4 Choose the Supply Method
1. If you want the eReserves team to track down the material, choose the first option.
2. If the material is online, choose the second option and then enter the URL in the field just below.
3. If you already have a nice PDF, choose the third option. After you submit the form, you will be prompted to upload the file.
4. If you have a print copy that you would like us to scan, choose the last option. Send us an email letting us know when you drop it off at the library circulation desk so we know to look for it. Once we have scanned it we’ll send you an email letting you know you can pick it up from the circulation desk at your convenience
While you can manually change the access dates for individual items on this form, we recommend that you contact us by email (ereserves@fuller.edu) if you want to adjust these dates.
-
2.5 Submit the Form
When you’re done filling out this form, click “submit item.”
Your request is in the system, and the eReserves Office will start working on it in the order in which it was submitted.
-
2.6 Processing Times
Submit your requests at least one month before the start of the quarter so that we have adequate time to make them available to your students. Processing times can vary significantly depending on how easy it is to get copyright permission and/or scan the material.
Every request that you have made will be listed on the main course eReserves page, along with the current status of each item.
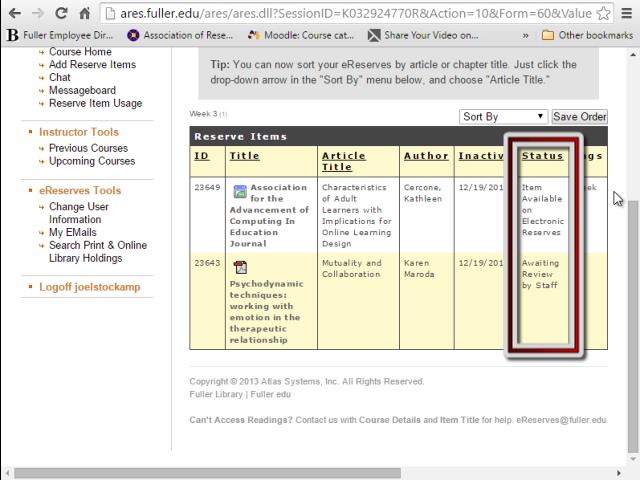
If the status is “Item Available on Electronic Reserves,” that means we have finished processing the item and it will be available to your students at the start of the quarter. If the status is anything else, that means we are still working on processing the item.
The easiest way to see what items are available to students at any particular moment is by clicking “Switch to Student Mode,” but it’s important to remember that even if an item has been fully processed and has the status “Available on Electronic Reserves,” it won’t be visible to students until it falls within the start and stop dates of your course’s term.
This is the basic process of requesting eReserves. The next section will explain how to import items you have used in the past.
-
Import Readings From Another Course
Instructors often end up using the same eReserve items that they’ve used for previous courses. Our eReserves software has a tool to let you copy items from previous courses instead of filling out all the item information again for the new course.
-
3.1 Choose a Previous Course
Click “Add Reserve Items” located on the left sidebar.
Instead of choosing the item type, look at the box that says “Or would you like to import items from another course?” All your previous courses should be listed here. Click on the course from which you’d like to import items. -
3.2 Select the Items
Check the boxes next to all the items you want to import. All the item history and attached files will be copied as well, which makes processing the request much easier.
If you would like to copy items from a course for which you were not the instructor, or if your previous course is not showing up, email the eReserves team for help (ereserves@fuller.edu).
Now that you can save yourself time by importing this way, check out the next section to learn how to save your students time by organizing your course readings.
-
Organize Your Course Readings
If you have a lot of eReserves items for a course, finding particular items can be difficult. There are a few ways to make this easier.
-
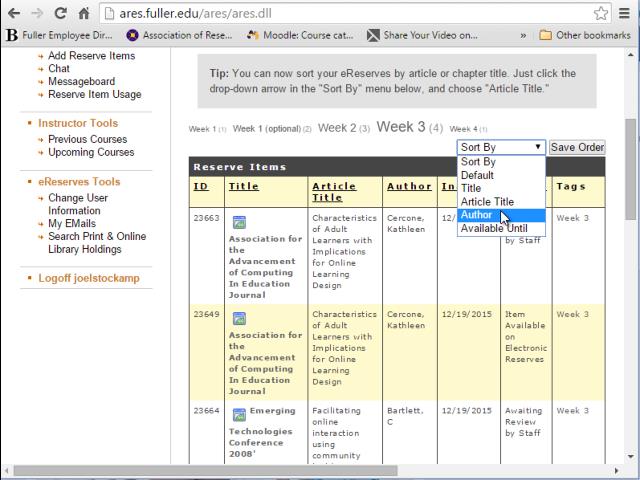
4.1 Sorting Menus
You can order the items by title or author by using the “Sort By” drop-down menu.
-
4.2 Manually Arrange
Click on an item title and drag it up or down to a different place in the list. Once the items are in the order you prefer, click “Save order” so that the items will appear in this order to you and your students.
-
4.3 Using Tags
Another way to organize your items is by adding tags. These are words you associate with particular sets of items, usually based on the subject matter or the assignment date. The tag words are displayed at the top of the item list. You and your students can click on a tag to see all the items associated with that tag.
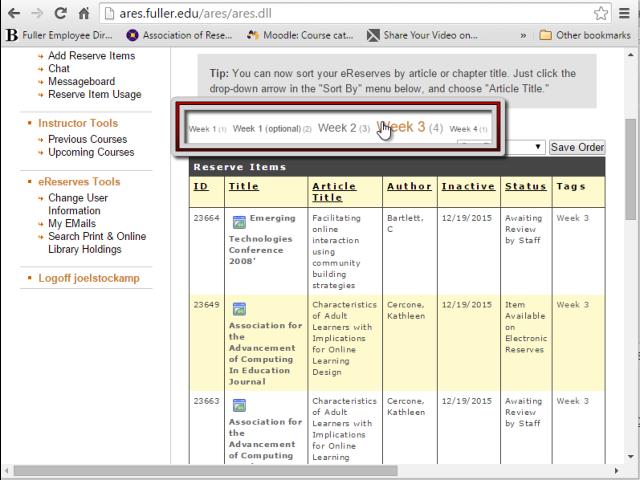
To add a tag, click on an item and then type the word or words into the box. If you want to add more than one tag for a single item, just separate the tags with a comma.
-
4.4 Instructor vs Student Mode
Check out the left-hand sidebar. It will either say “Switch to Instructor Mode” or “Switch to Student Mode.” This is a useful tool for you to see what the course looks like to your students.
If you see:
Switch to Student Mode: You are viewing the page as an instructor
Switch to Instructor Mode: You are viewing the page as it looks to your students.To add items and see their status, you will need to be in instructor mode and you should see “Switch to Student Mode” displayed to your left.